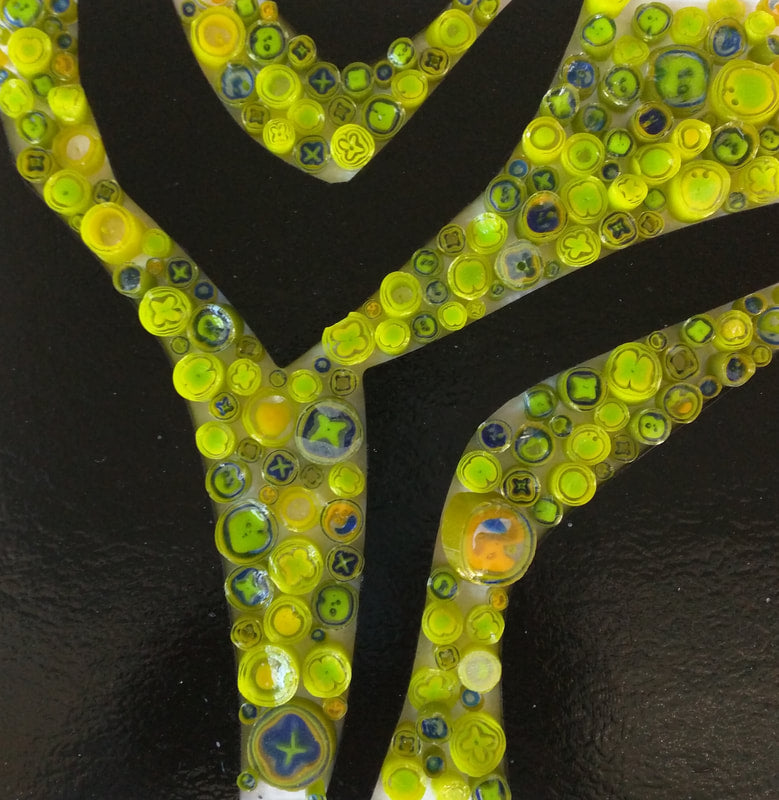
 Murrini glass is name for the small circles of glass with patterns inside them.
 Murrine production first appeared in the Middle East more than 4,000 years ago and was revived by Venetian glassmakers on Murano in the early 16th century.[1]
Once murrine have been made, they can be incorporated into a glass vessel or sculpture in several ways." (from Wikipedia)
In the picture above I have fused many segments of murrine to make this wall work. 10x10x.5
Originally Murrine was made in a glass studio in a very time consuming way by building the designs with stringers( strings) and then heating then and pulling them like taffy. They were then cut up and used to make beautiful Art . The work was magnificent and took a great deal of time to produce.
Now forming the murrini in a special type of kiln is possible but it takes some special knowledge and equipment.
I have embarked on adding this process to my art.

So after taking a class I decided to set up a caldera kiln in my own studio. One big problem was there is very little information available on step by step instructions and resources needed to make a mobile kiln stand and all the shelves and supports.
My design parameters were to have a mobile stand that provided access to all sides. I do many things in my studio so having the kiln mounted to the wall was not a solution. This is what I came up with with my local resources. If you have resource questions let me know and I will try and help.
Here's a big thank you for the brain stimulation to do this blog from my Google kids, and a thank you to Larry Pile for a great course. I also recommend the Video course by AEE Glass by Nathan Sandburg on making murrini.
This is how I made the stand for this kiln. If you have suggestions or ideas or how how I might improve this design I would love your feedback. Safety first ... Use at your own risk..and read the kiln instructions well.
I made the kiln shelf from 1 inch unifrax fiber board i bought from hollander glass. I cut the 48 inch long board into a 24 x24 size with a utility knife. Wear a mask when cutting as the material is toxic in your lungs!! You can also cut the board with hand saw or knife.
The stock size is 48x24. I used the 1 inch thickness. I bought this for Hollander Glass. They have an online store

you need both....
Very Important
Wear a mask when cutting board or painting on rigidizer!!!! I use the model below as it works for all the things I do in the studio with the p 100 cartridges
Click on link below to order

Next I cut one 2 inch hole with a hole saw. You can borrow one from a woodworking friend or below . It is used to drill doors for door handles. Wear a mask when cutting board!!
Click on image below to buy


Next I rigidized the fiber board.. by first painting on a silica rigidizer, and second by firing it in my kiln. I applied the rigidizer (which is a thin bluish liquid) with a disposable brush. I poured the stock solution from the large gallon container into a small jar. When you paint this on you get many drips, so I placed the small jar directly on fiberboard, problem solved. Next I let this dry overnight. 
|
|
I bought the rigidizer from Hollander Glass.

MSDS Sheet on rigidizer below
| msds-rigidizer-usa.pdf |
During the drying I set the fiber board on some small plastic cups to elevate it and allow air to both sides of the board. I set in by a fan in a well ventilated shop. In hindsight, I ended up with some small round indentations in the final fired board where the cups were. No issue for this project but would use a different way to elevate board if I wanted a totally flat surface for a kiln shelf.
Before drying I cut the corners to fit my stand. When dry it turned a bluish / purple color. Wear gloves and a mask. 

You can see the indentation in fiber board after firing from plastic glass support I used during drying.


Next I moved the fiber board to to my kiln and elevated it on 1 inch kiln posts and fired at 400 (degrees in F) per hour to 1200 degrees then turned off the kiln to cool. When firing the board the first time it has an odor so use good ventilation. I left kiln partially open to vent during firing about a 1/2 inch for any residual water vapor.


Now on to the stand. I bought the stand at Ace restaurant supply. I liked this design because all sides were open. Other stands will work as well. I had to ask the manager for parts as they were in warehouse. It cost about 240 dollars for stand including rollers. The fiber shelf cost was about 80 and rigidizer 30 plus. The coasters on this stand are lockable. But I found this on amazon; All in and complete for 79 dollars. A friend ordered it and said the quality was great. The only issue was the size of the shelves 18x24, not 24x24. I am sure it would work fine and is at a much better price.

Next I cut a hole in middle of top shelf for glass to flow thru from the Caldera Kiln. I used my plasma cutter to do this, but a Dremel tool or a heavy duty wire cutter will work. When assembled it fits well into the storage area in my studio. But, on hindsight I think I cut the hole to large in the top shelf. I did not want to chance the kiln shelf coming thru. Perhaps a non-issue but I decided to fix it.

I had some stainless steel vessels fabricated at a local shop in 304 stainless. The square shape I modified and reinforced the corners so they would not deform when removing the glass. They are available in my online store.
So to fix the big hole I had some stainless sheet from another art project, so fabricated 2 solid shelves. 1 with smaller hole for under fiberboard which supports the kiln, and one to cover the bottom shelf. Problem solved.
|
|
|


Cyndi and Hollander Glass used an Ikea bowl under kiln for scrap and glass drops. I ordered bowl online as it was not stocked in our local Ikea, in Houston. I now found them on amazon.

to buy bowl click on the link below

I protected the cork floor in my studio with a welding blanket so any loose hot glass pieces will not start a fire. This blanket protects up to 1500 degrees and is a good size 6 foot by 8 foot. There are cheaper versions but this worked perfect with no damage to floors. 


Next I placed the kiln on top and zip tied the cord to the outside of the poles so it would not move. I left some extra slack in the cord so I could move kiln around.. (Put blankets over the cord to protect it is glass falls.)
I also zip tied the programing card for the Caldera kiln to the stand so I would not lose it. I use a ladder on the side of the kiln to load the vessels full of glass. You need to center the vessels on the center hole in the shelf when firing.
 |
|
So next up is reading the kiln instructions front to back, cutting some glass and filling the vessels and giving it a test spin!! Use a good ladder to work on kiln and to fill and clean it.
This was the set up I used for firing. Annealing kiln next to Murrini Stand. 

A birds eye view of my studio as I have it set up to pull murrini.
Feedback after the first firing:
Stand functions well and shelf and catch bowl worked great. Love the portability and the welding cloth worked perfect to protect a couple of piece of hot glass that hit the floor. I especially liked how easy it was to clean up and put everything back into place.I used a heavy duty extension cord 12 g as recommended by paragon. It worked perfectly. I had some great friends stop by for the first firing and I think it take 2 people to do this safely for the first few times. One to raise the annealing kiln lid and the other to pull and cut the hot glass. It took around 1.5 hours to pull a full pot. Kiln was turned on at 730 am and we had glass flowing by 10 45 until noon. I will put more info on my blog on the first firing.

Comments will be approved before showing up.

carolyne
September 01, 2019
Hi Al
really appreciate your blog just bought a vit kiln same as yours wondering about asking a blacksmith here in UK to make me a stand I think I will show him your blog so he will know what I am on about.
Thank you
Caro